UITableViewのRxSwiftデータバインディング、CustomCellを使ったバインディング
tamappe Tamappe Life Log
今回はRxSwiftの機能をまとめたUITableView用のデータバインディングライブラリRxDataSourceを使ってUITableViewを実装していく方法を解説します。
RxDataSourceの概要を説明すると
Writing table and collection view data sources is tedious. There is a large number of delegate methods that need to be implemented for the simplest case possible.
TableviewおよびCollectionViewのdataSourceを作成するのは面倒です。可能な限り最も単純な場合に実装する必要がある多数のデリゲートメソッドがあります。
RxSwift helps alleviate some of the burden with a simple data binding mechanism:
RxSwiftは、単純なdata binding mechanismによって、負担を軽減するのに役立ちます。
- Turn your data into an Observable sequence
- Bind the data to the tableView/collectionView using one of:
1). データをObservableなシーケンスに変換する
2). 次のいずれかを使用して、データをtableView / collectionViewにバインドします。
例えば、下記のような構文があります。
let data = Observable<[String]>.just(["first element", "second element", "third element"])

data.bind(to: tableView.rx.items(cellIdentifier: "Cell")) { index, model, cell in
  cell.textLabel?.text = model
}
.disposed(by: disposeBag)
This works well with simple data sets but does not handle cases where you need to bind complex data sets with multiples sections, or when you need to perform animations when adding/modifying/deleting items.
これは単純なデータの設定ではうまく機能しますが、複雑なデータの設定となると複数のセクションでバインドする必要がある場合や、アイテムを追加/変更/削除するときにアニメーションを実行する必要がある場合は扱えません。
These are precisely the use cases that RxDataSources helps solve.
これらはまさにRxDataSourcesが解決に役立つユースケースです。
With RxDataSources, it is super easy to just write
RxDataSourcesを使えばこのように書くだけでとても簡単です。
let dataSource = RxTableViewSectionedReloadDataSource<SectionModel<String, Int>>(configureCell: configureCell)
Observable.just([SectionModel(model: "title", items: [1, 2, 3])])
    .bind(to: tableView.rx.items(dataSource: dataSource))
    .disposed(by: disposeBag)
とこんな風に書くことが可能になります。
(ただ、私としてはタイプ量が変わらないのでどっちもどっち感は少なからずあったりします。)
実務ではこのRxDataSourceを使ったアプリもあると思います。
そこで今回はこのRxDataSourceを使って簡単なテンプレートを作成してみました。
今回は一度ソースコードをリセットしてVCを一つだけにしています。
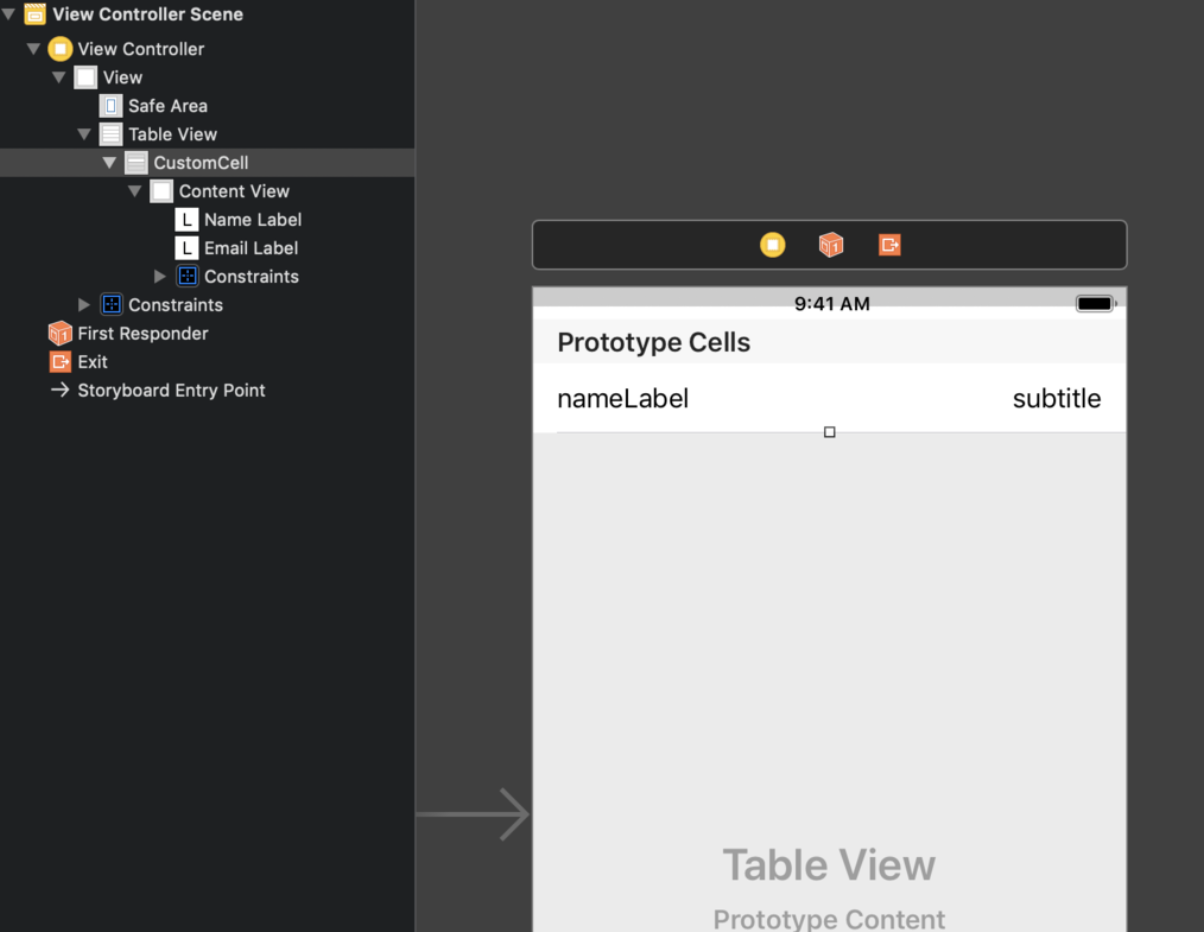
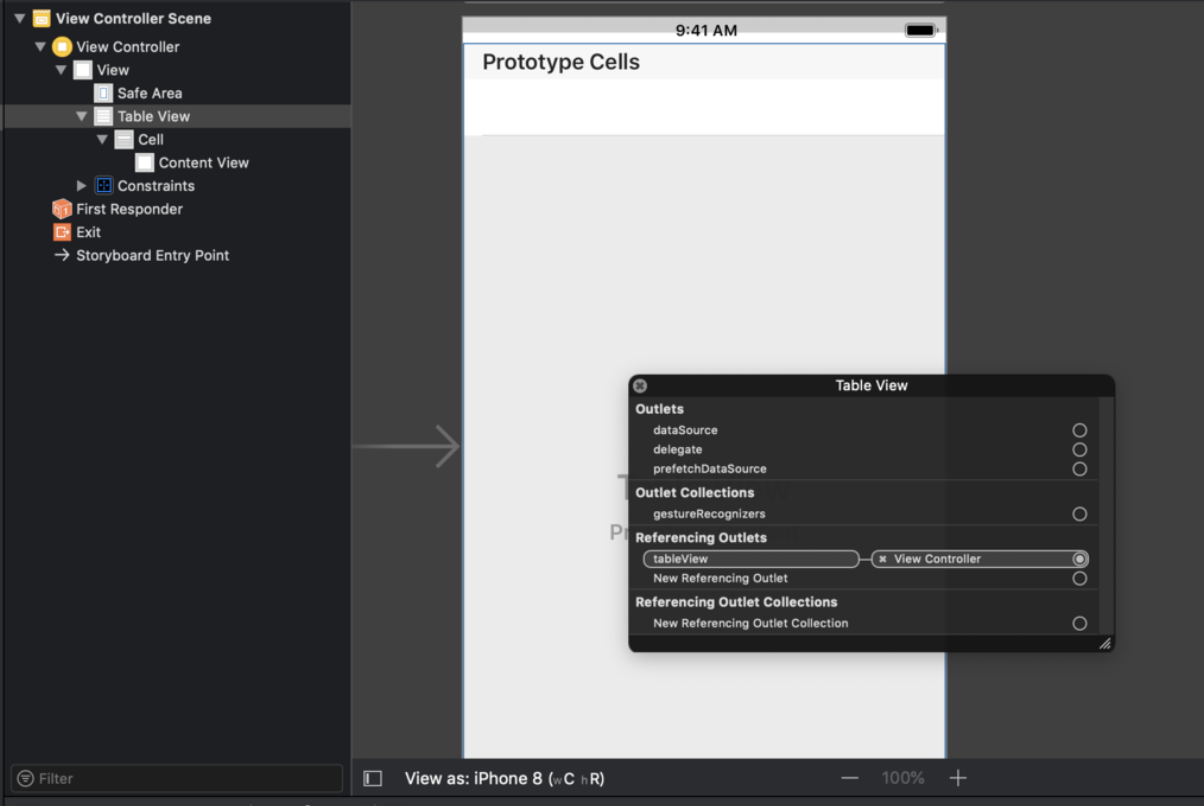
Main.storyboard

rxdatasource_3
このようにTableViewとUITableViewCell(identifierにはCellをセットしておく)を乗せています。
今回は新しくしたのでこのように編集しています。
Podfile
# Uncomment the next line to define a global platform for your project
# platform :ios, '9.0'

target 'RxTableView' do
  # Comment the next line if you're not using Swift and don't want to use dynamic frameworks
  use_frameworks!

  # Pods for RxTableView
    pod 'RxSwift', '~> 4.0'  # 追加する
    pod 'RxCocoa', '~> 4.0'  # 追加する
    pod 'RxDataSources', '~> 3.0'

  target 'RxTableViewTests' do
    inherit! :search_paths
    # Pods for testing
  end

  target 'RxTableViewUITests' do
    inherit! :search_paths
    # Pods for testing
  end

endでは実際にRxDataSourceを使った場合のソースコードをまとめて書いてみます。
ViewController.swift
import UIKit
import RxSwift
import RxCocoa
import RxDataSources

/// TableViewCellに紐付けるDataModel
struct CustomCellModel {
    var name: String
    var email: String
}

/// セクションヘッダーの名前とセクション内のitem
struct SectionOfCustomData {
    /// セクションヘッダーの名前
    var header: String
    /// indexPath.row のcellのデータ
    var items: [Item]
}

/// RxDataSourceを使ってDataModelとdataSourceを紐づけるため
extension SectionOfCustomData: SectionModelType {
    // Item に CellのDataModelを紐づける
    typealias Item = CustomCellModel

    // ほぼテンプレで可能
    init(original: SectionOfCustomData, items: [Item]) {
        self = original
        self.items = items
    }
}

class ViewController: UIViewController {

    @IBOutlet weak var tableView: UITableView!

    let disposeBag = DisposeBag()

    let dataSource = RxTableViewSectionedReloadDataSource<SectionOfCustomData>(
        configureCell: { dataSource, tableView, indexPath, item in
            let cell = tableView.dequeueReusableCell(withIdentifier: "Cell", for: indexPath)
            cell.textLabel?.text = item.name
            return cell
    })

    // 複数のsectionを表示させたい場合はSectionOfCustomDataを生成していきます。
    // SectionOfCustomData の
    let sections = [
        SectionOfCustomData(header: "1st section",
                            items: [CustomCellModel(name: "山田花子", email: "hanako@gmail.com"),
                                    CustomCellModel(name: "田中太郎", email: "taro@gmail.com"),
                                    CustomCellModel(name: "石田真一", email: "shinichi@gmail.com")]),
    ]

    override func viewDidLoad() {
        super.viewDidLoad()

        Observable.just(sections)  // sectionsを生成して
            .bind(to: tableView.rx.items(dataSource: dataSource))  // itemsのdataSourceに紐づける
            .disposed(by: disposeBag)
    }
}
以上となります。
各ソースコードの部分にコメントを書いています。
このコメントの意味を理解すればRxDataSourceの基本的な使い方が分かるように説明しています。
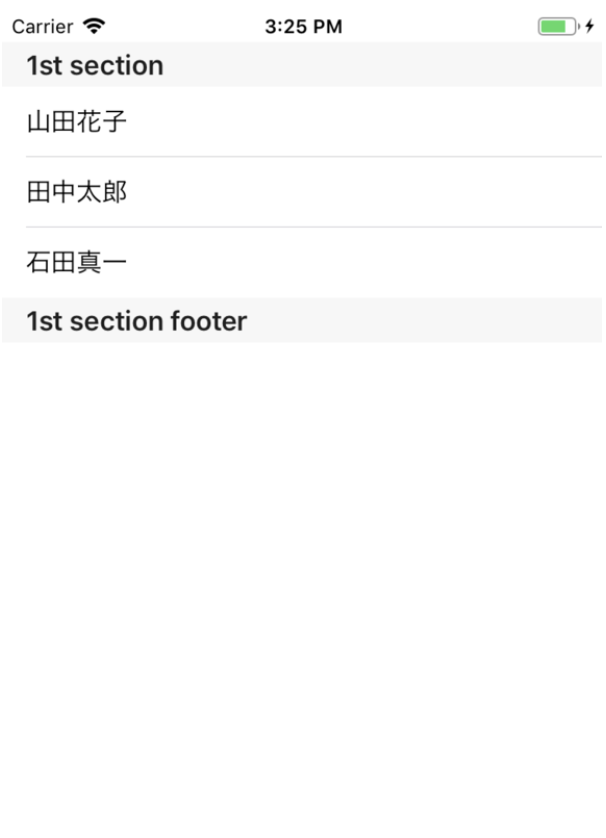
このコードをビルドするとアプリは次のように表示されます。

rxdatasource_2
実際にアプリでデータが表示されたことが確認できました。
RxDataSourceに慣れるとよりtableViewやcollectionViewでより複雑なレイアウトを実装するのが楽になりますので挑戦してみてもいいかもしれませんね。
おそらくCustomHeaderViewやCustomFooterViewが必要なアプリだとRxDataSourceに頼らざるを得ない印象はあります。