41.【AppleMusicクローン】Dartでのenumの使い方と具体例
tamappe Tamappe Life Log
こんにちは、Tamappeです。
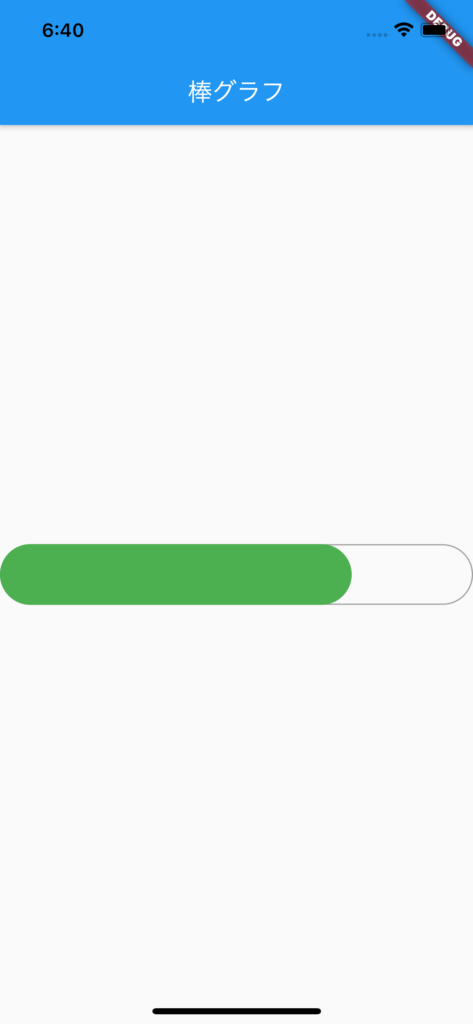
本日は、Flutterで棒グラフのUIを作成する方法について解説します。
最終成果物は次のような画像になります。
使用するウィジェットはStackになります。
復習になりますが、Flutterにおいて複数のウィジェットを並べるものは3種類あります。
| ウィジェット | 役割 |
| Column | ウィジェットを縦方向(vertical)に並べる |
| Row | ウィジェットを横方向(horizontal)に並べる |
| Stack | ウィジェットを重ねるように並べる |
今回はウィジェットを重ねるのでStackを使います。
Stackの使い方は
Stack(
          children: [
            Container(
              color: Colors.blue,
            ),
            Container(
              color: Colors.green,
            ),
          ]
        ),
こんな感じにchildrenのフィールドにウィジェットを配列で宣言していくように使います。
それでは、まずは簡単に2つのContainerを載せてみます。棒グラフのクラスはBarGraphViewと命名します。
main.dart
import 'package:flutter/material.dart';

void main() {
  runApp(MyApp());
}

class MyApp extends StatelessWidget {
  @override
  Widget build(BuildContext context) {
    return MaterialApp(
      theme: ThemeData(
        primarySwatch: Colors.blue,
      ),
      home: BarGraphView(),
    );
  }
}

class BarGraphView extends StatelessWidget {
  const BarGraphView({Key? key}) : super(key: key);

  @override
  Widget build(BuildContext context) {
    return Scaffold(
      appBar: AppBar(
        title: Text('棒グラフ'),
      ),
      body: Center(
        child: Stack(
          children: [
            Container(
              width: MediaQuery.of(context).size.width,
              height: 50.0,
              color: Colors.grey,
            ),
            Container(
              width: MediaQuery.of(context).size.width - 100,
              height: 50.0,
              color: Colors.green,
            ),
          ]
        ),
      ),
    );
  }
}
これでアプリをビルドすると、次のように画面真ん中に棒が表示されます。

これで準備ができました。二つのContainerが重なっていることがわかります。
次に棒グラフぽく見せたいので、棒に角丸をつけます。
丸みは Container の decoration に BoxDecoration をつけることで実現できます。
Container(
      decoration: BoxDecoration(
        borderRadius: BorderRadius.circular(10), // 10は丸みの量
      ),
    );
これを利用して、先程の2つのContainerに角丸をつけます。
Container(
              width: MediaQuery.of(context).size.width - 100,
              height: 50.0,
              color: Colors.green,
              decoration: BoxDecoration(
                borderRadius: BorderRadius.circular(25), // 25は丸みの量
              ),
            )
ですが、このように設定すると次のようなエラーが表示されてビルドに失敗します。
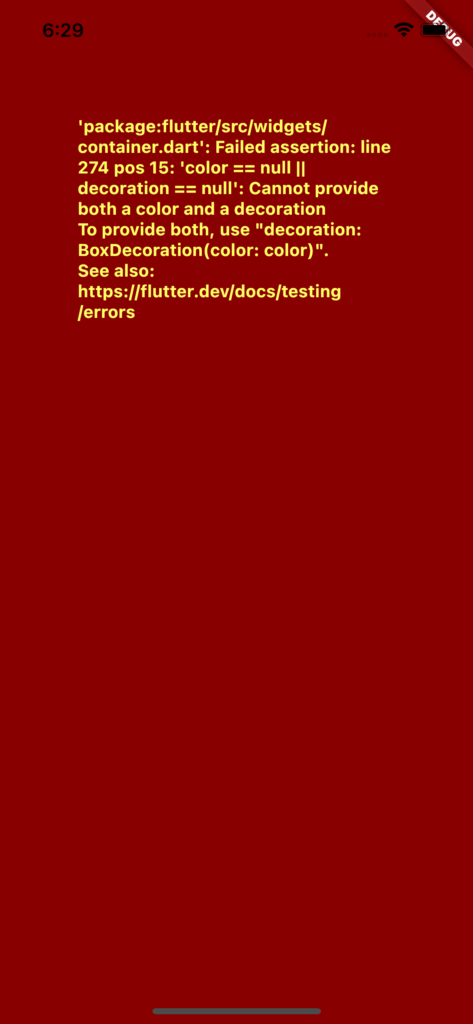
これはContainerのcolorの設定はBoxDecoration側につけてくださいというエラーメッセージです。
そのため、正解はこのように書きます。
Container(
              width: MediaQuery.of(context).size.width - 100,
              height: 50.0,
              decoration: BoxDecoration(
                borderRadius: BorderRadius.circular(25), // 25は丸みの量
                color: Colors.green,
              ),
            )
これでContainerに色と角丸をつけられるようになります。
それでは、これを使って、BarGraphViewクラスを次のように修正します。
class BarGraphView extends StatelessWidget {
  const BarGraphView({Key? key}) : super(key: key);

  @override
  Widget build(BuildContext context) {
    return Scaffold(
      appBar: AppBar(
        title: Text('棒グラフ'),
      ),
      body: Center(
        child: Stack(
          children: [
            Container(
              width: MediaQuery.of(context).size.width,
              height: 50.0,
              decoration: BoxDecoration(
                borderRadius: BorderRadius.circular(25), // 25は丸みの量
                color: Colors.grey,
              ),
            ),
            Container(
              width: MediaQuery.of(context).size.width - 100,
              height: 50.0,
              decoration: BoxDecoration(
                borderRadius: BorderRadius.circular(25), // 25は丸みの量
                color: Colors.green,
              ),
            ),
          ]
        ),
      ),
    );
  }
}
これで再度ビルドし直すと次のように表示されるのがわかります。
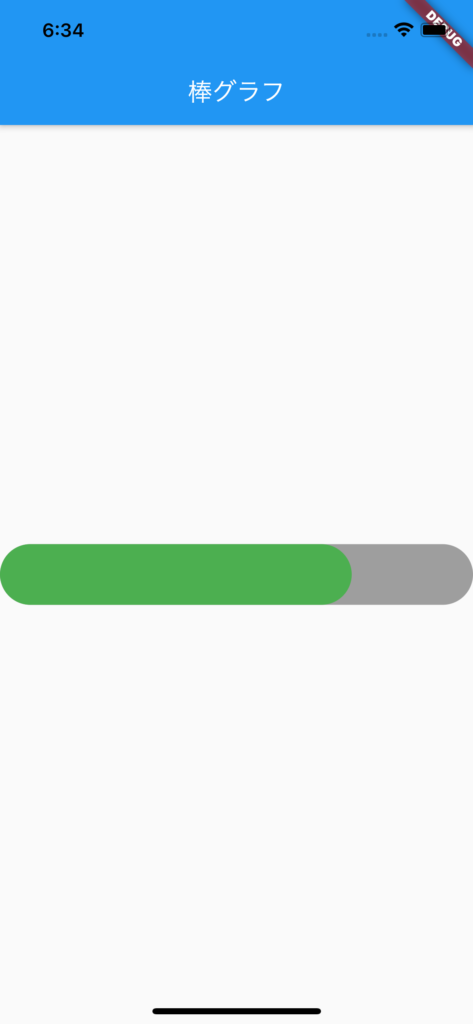
無事にグレート緑色のCotainerに角丸が付いていることがわかります。
ちょっと背景がグレーなので、緑色の部分が見づらいですね。
最後に後ろ側のグレーを枠線に変更します。
枠線はBoxDecorationのborderを設定すれば枠線に色をつけられます。代わりにcolorの設定を削除します。
Container(
              width: MediaQuery.of(context).size.width,
              height: 50.0,
              decoration: BoxDecoration(
                borderRadius: BorderRadius.circular(25), // 25は丸みの量
                border: Border.all(color: Colors.grey), // 枠線の色
              ),
            )
それでは、先程のBarGraphviewを次のように変更します。
class BarGraphView extends StatelessWidget {
  const BarGraphView({Key? key}) : super(key: key);

  @override
  Widget build(BuildContext context) {
    return Scaffold(
      appBar: AppBar(
        title: Text('棒グラフ'),
      ),
      body: Center(
        child: Stack(
          children: [
            Container(
              width: MediaQuery.of(context).size.width,
              height: 50.0,
              decoration: BoxDecoration(
                borderRadius: BorderRadius.circular(25), // 25は丸みの量
                border: Border.all(color: Colors.grey), // 枠線の色
              ),
            ),
            Container(
              width: MediaQuery.of(context).size.width - 100,
              height: 50.0,
              decoration: BoxDecoration(
                borderRadius: BorderRadius.circular(25), // 25は丸みの量
                color: Colors.green,
              ),
            ),
          ]
        ),
      ),
    );
  }
}
これで再度ビルドし直すと画面上では次のように表示されます。
これで棒グラフの完成です。
今回で、StackとBoxDecorationを使った角丸と枠線の実装方法について学びました。
それでは、バイバイ。