30.【クイズアプリ開発】 Flutterでリセット画面を実装する
前回のあらすじ
今回はFlutterで4択クイズが終わったあとのリセット画面を実装したいと思います。
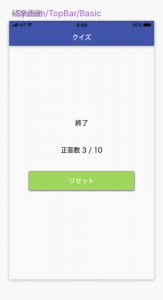
リセット画面
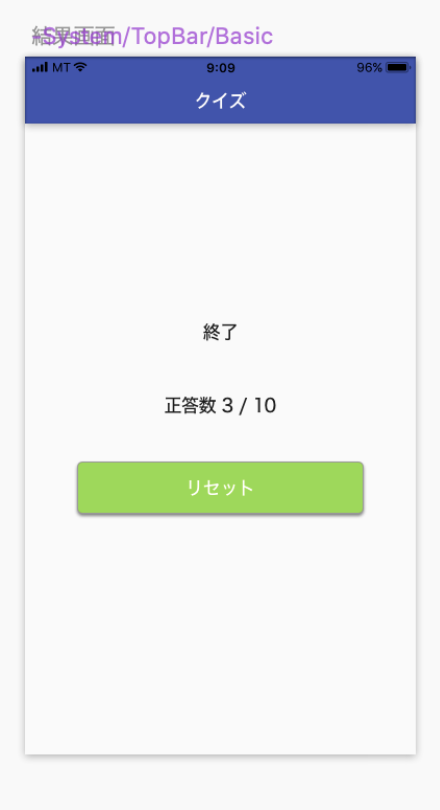
Sketchでデザインしました。
とりあえず、
- 正答数
- リセットボタン
の2つを目標にしようと思います。
またリセットボタンを実装するためボタンの実装が必要になります。
前回もボタンの実装をしたかもしれません。
リセット画面の実装
今回はwidgetパッケージにresult_page.dartファイルを追加しています。
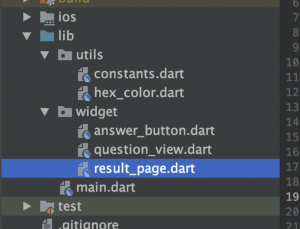
リセット画面用のウィジェット
result_page.dart
import 'package:flutter/material.dart';

class ResultPage extends StatelessWidget {

  final Function _tapResetButton;

  ResultPage(this._tapResetButton);

  @override
  Widget build(BuildContext context) {
    return Column(
      children: [
        Text('問題が終了しました!'),
        RaisedButton(
          child: Text('リセットする'),
          onPressed: _tapResetButton,
        )
      ],
    );
  }
}最初はこれどう考えてもStatefullWidgetじゃないとindexを0にリセットできないよなと思って
StatefullWidgetで実装していました。
というのもsetState() {}メソッドで画面を更新したかったからです。
ですが、どうやら、親から子に渡したindexを子で更新しても親には反映されないので画面切り替えができなかったのです。
ミスった設計
class ResultPage extends StatefulWidget {
  int quesitonIndex;

  ResultPage(this.quesitonIndex);

  @override
  _ResultPageState createState() => _ResultPageState();
}

class _ResultPageState extends State<ResultPage> {
  @override
  Widget build(BuildContext context) {
    return Column(
      children: [
        Text('問題が終了しました!'),
        RaisedButton(
          child: Text('リセットする'),
          onPressed: () {
            setState(() {
              widget.quesitonIndex = 0;
            });
          },
        )
      ],
    );
  }
}
これでハマって1日やる気がなくなりました。
思い返して、Functionでメソッドを渡してやればいいだけだと気づいてStatelessWidgetで実装してみることになりました。
ボタンタップ時の実装
今回は選択肢ボタンをタップしたときの処理とリセットボタンの処理を実装していきます。
選択肢ボタンをタップしたときは問題文のindexを1増やしてやればいいです。
リセットボタンをタップしたときはindexを0にすればいいですね。
つまり、main.dartにて次の関数を宣言します。
main.dart
void _answerQuestion() {
    setState(() {
      _questionIndex++;
    });
  }

  void _resetIndex() {
    setState(() {
      _questionIndex = 0;
    });
}あとはそれぞれのButtonのonPressedにこのメソッドを渡せばいいという感じです。
前回は選択肢ボタンをAnswerButtonと命名していましたので次のように代入していきます。
AnswerButton(
                        questions: _questions,
                        questionIndex: _questionIndex,
                        answerQuestion: _answerQuestion,
keyString: 'd')ただ、これだとAnswerButtonはButtonクラスだと分かりますが、どれがonPressedに該当するのか読み取りにくくなりました。
無念です。
今回みたいにFunction型のプロパティを使う場合は変数名に気をつけないといけないのが分かりました。
多分、onPressedに該当するプロパティはonPressedAnswerButtonというような命名のほうがわかりやすいのかもしれません。
それはまあ今後検討してみます。
問題画面からリセット画面に遷移させる方法
率直に言えば、if文を使うことになります。
前回、
main.dart
/// 問題文のindex
  var _questionIndex = 0;
  /// 問題
  var _questions = [
    {
      'question':
          'The weather in Merizo is very (x) year-round, though there are showers almost daily from December through March.',
      'a': 'agreeable',
      'b': 'agree',
      'c': 'agreement',
      'd': 'agreeably',
      'correctAnswer': 'A'
    },
    {
      'question':
          '(x) for the competition should be submitted by November 28 at the latest.',
      'a': 'Enter',
      'b': 'Entered',
      'c': 'Entering',
      'd': 'Entries',
      'correctAnswer': 'D'
    }
  ];
と宣言したので
body: Center(
        child: _questionIndex < _questions.length ? 問題文 : リセット画面
というふうに三項演算子を使って切り替えようと思います。
実際はデザインペターンみたいな設計があるように思いますがまだ設計は学習前なので難しいことはできません。
まとめ
それでは上記を総括してサンプルコードを載せたいと思います。
result_page.dart
import 'package:flutter/material.dart';

class ResultPage extends StatelessWidget {

  final Function _tapResetButton;

  ResultPage(this._tapResetButton);

  @override
  Widget build(BuildContext context) {
    return Column(
      children: [
        Text('問題が終了しました!'),
        RaisedButton(
          child: Text('リセットする'),
          onPressed: _tapResetButton,
        )
      ],
    );
  }
}
main.dart
import 'package:flutter/material.dart';
import 'package:flutter_quiz_app/widget/result_page.dart';
import './utils/constants.dart';
import './widget/answer_button.dart';
import './widget/question_view.dart';


void main() => runApp(MyApp());

class MyApp extends StatelessWidget {
  // This widget is the root of your application.
  @override
  Widget build(BuildContext context) {
    return MaterialApp(
      theme: ThemeData(
        primarySwatch: Colors.blue,
      ),
      home: MyHomePage(),
    );
  }
}

class MyHomePage extends StatefulWidget {
  @override
  _MyHomePageState createState() => _MyHomePageState();
}

class _MyHomePageState extends State<MyHomePage> {
  /// 問題文のindex
  var _questionIndex = 0;
  /// 問題
  var _questions = [
    {
      'question':
          'The weather in Merizo is very (x) year-round, though there are showers almost daily from December through March.',
      'a': 'agreeable',
      'b': 'agree',
      'c': 'agreement',
      'd': 'agreeably',
      'correctAnswer': 'A'
    },
    {
      'question':
          '(x) for the competition should be submitted by November 28 at the latest.',
      'a': 'Enter',
      'b': 'Entered',
      'c': 'Entering',
      'd': 'Entries',
      'correctAnswer': 'D'
    }
  ];

  void _answerQuestion() {
    setState(() {
      _questionIndex++;
    });
  }

  void _resetIndex() {
    setState(() {
      _questionIndex = 0;
    });
  }

  @override
  Widget build(BuildContext context) {
    return Scaffold(
      appBar: AppBar(
        title: Text('文法問題'),
      ),
      body: Center(
        child: _questionIndex < _questions.length ? Column(
          mainAxisAlignment: MainAxisAlignment.start,
          children: [
            Container(
              height: Constants().questionAreaHeight,
              color: Colors.red,
              child: Center(
                child: Text(
                  '(x)に入る単語を答えよ。',
                  style: TextStyle(fontSize: 20),
                ),
              ),
            ),
            Container(
              height: Constants().questionAreaHeight,
              color: Colors.green,
              child: Center(
                child: Text(
                  'Q${_questionIndex + 1}',
                  style: TextStyle(fontSize: 18),
                ),
              ),
            ),
            QuestionView(questionIndex: _questionIndex, questions: _questions),
            Expanded(
              child: Padding(
                padding: const EdgeInsets.fromLTRB(50.0, 30.0, 50.0, 50.0),
                child: Column(
                  mainAxisAlignment: MainAxisAlignment.spaceEvenly,
                  children: [
                    AnswerButton(
                        questions: _questions,
                        questionIndex: _questionIndex,
                        answerQuestion: _answerQuestion,
                        keyString: 'a'),
                    AnswerButton(
                        questions: _questions,
                        questionIndex: _questionIndex,
                        answerQuestion: _answerQuestion,
                        keyString: 'b'),
                    AnswerButton(
                        questions: _questions,
                        questionIndex: _questionIndex,
                        answerQuestion: _answerQuestion,
                        keyString: 'c'),
                    AnswerButton(
                        questions: _questions,
                        questionIndex: _questionIndex,
                        answerQuestion: _answerQuestion,
                        keyString: 'd'),
                  ],
                ),
              ),
            )
          ],
        ) : ResultPage(_resetIndex),
      ),
    );
  }
}
このように変更してみました。
ビルドが成功したら、選択肢ボタンをタップすると問題が切り替わって3回目でリセット画面が表示されるはずです。
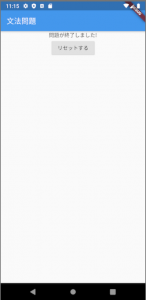
リセット画面
デザインはまだ反映していません。
リセットボタンをタップするとまた問題1に戻る画面遷移になります。
残るタスクは
- リセット画面のデザイン実装
- 問題の正答数の計算
ぐらいは実装しようかなと思っています。
本日はこれくらいで終わりにします。


