24. Flutterでの関数の型プロパティFunctionの導入と関数の初期化の方法
tamappe Tamappe Life Log
今回は前回作成したクイズアプリのレイアウトのリファクタリングを行います。
前回はレイアウトの組立自体は完了しましたがwidgetのインデントが深くなりすぎていました。
Flutter開発の肝はwidgetのインデントはなるべく深くならないようにすること、
つまりwidgetの粒度をなるべく小さくしてメンテナンス性をあげることらしいです。
そのため今回は画面の見え方は同じですが、裏側のロジックを分割してコードの見た目を綺麗にしていきたいと思います。
以前の記事にカスタムウィジェットクラスの作成方法について解説したことがあります。
前回のクラスでは4つの選択肢のRaisedButtonの部分が共通化できそうだったので、選択肢のボタン部分を綺麗にしていきたいです。
また問題文の英文は動的に変わる部分なので、文のStringをプロパティとしたカスタムなTextウィジェットクラスも作成したいです。
そして、今回から定数クラスも作成していきたいので新たに新規作成するクラスは
TextのカスタムウィジェットクラスRaisedButtonのカスタムウィジェットクラスこれらを作成していきます。
定数クラスはconstants.dartで作成します。
Constants.dart
class Constants {
  /// 問題文ウィジェットの高さ
  final double questionAreaHeight = 70.0;
  /// 回答の選択肢ボタンの高さ
  final double answerButtonHeight = 50.0;
}
とりあえず、このようにして数値に関わる部分を定数化していきます。
Textのカスタムウィジェットクラス次に問題文のウィジェット(widget)をカスタムクラスにしておきます。
ここは問題のデータに応じてtextが動的に変更されてしまいます。
そこでこのtext部分だけ渡したいですが、データを配列で渡す想定なので問題データ配列とindexを
引数にしてmain.dartから渡せるようにします。
それを踏まえてカスタムクラスquestion_view.dartを作成します。
question_view.dart
import 'package:flutter/material.dart';

class QuestionView extends StatelessWidget {
  /// 問題文のidかindexを渡す想定
  final int questionIndex;
  /// 問題文オブジェクト
  final List<Map<String, Object>> questions;

  QuestionView({@required this.questionIndex, @required this.questions});

  @override
  Widget build(BuildContext context) {
    return Container(
      color: Colors.yellow,
      child: Padding(
        padding: const EdgeInsets.all(20.0),
        child: Center(
          child: Text(
            questions[questionIndex]['question'],
            style: TextStyle(fontSize: 20),
          ),
        ),
      ),
    );
  }
}
これで問題文を動的に渡す準備ができました。
RaisedButtonのカスタムウィジェットクラス最後に回答の選択肢のボタンが4つ同じような構成で存在しますので共通できないかを検討します。
こちらはanswer_button.dartというファイル名で作成します。
answer_button.dart
import 'package:flutter/material.dart';
import '../utils/constants.dart';

class AnswerButton extends StatelessWidget {
  final int questionIndex;
  final List<Map<String, Object>> questions;
  final String keyString;

  AnswerButton({
    this.questionIndex,
    this.questions,
    this.keyString
  });

  @override
  Widget build(BuildContext context) {
    return SizedBox(
        width: double.infinity,
        height: Constants().answerButtonHeight,
        child: RaisedButton(
          child: Text(questions[questionIndex][keyString]),
          onPressed: null,
        ));
  }
}今回は3つのファイルを新しく作成しました。
今後も新しいウィジェットを作成して規模が大きくなるかもしれませんのでディレクトリ構成を考えておきます。
私は今回の想定では次にようにしました。
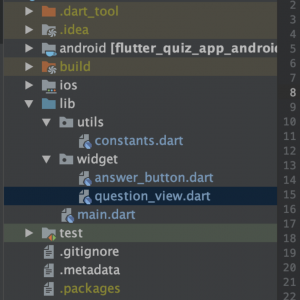
パッケージ構成
それではこれを踏まえてmain.dartを書き換えます。
main.dart
import 'package:flutter/material.dart';
import './utils/constants.dart';
import './widget/answer_button.dart';
import './widget/question_view.dart';

void main() => runApp(MyApp());

class MyApp extends StatelessWidget {
  // This widget is the root of your application.
  @override
  Widget build(BuildContext context) {
    return MaterialApp(
      theme: ThemeData(
        primarySwatch: Colors.blue,
      ),
      home: MyHomePage(),
    );
  }
}

class MyHomePage extends StatefulWidget {
  @override
  _MyHomePageState createState() => _MyHomePageState();
}

class _MyHomePageState extends State<MyHomePage> {
  /// 問題文のindex
  var _questionIndex = 0;

  var _questions = [
    {
      'question':
          'The weather in Merizo is very (x) year-round, though there are showers almost daily from December through March.',
      'a': 'agreeable',
      'b': 'agree',
      'c': 'agreement',
      'd': 'agreeably',
      'correctAnswer': 'A'
    },
    {
      'question':
          '(x) for the competition should be submitted by November 28 at the latest.',
      'a': 'Enter',
      'b': 'Entered',
      'c': 'Entering',
      'd': 'Entries',
      'correctAnswer': 'D'
    }
  ];

  @override
  Widget build(BuildContext context) {
    return Scaffold(
      appBar: AppBar(
        title: Text('文法問題'),
      ),
      body: Center(
        child: Column(
          mainAxisAlignment: MainAxisAlignment.start,
          children: [
            Container(
              height: Constants().questionAreaHeight,
              color: Colors.red,
              child: Center(
                child: Text(
                  '(x)に入る単語を答えよ。',
                  style: TextStyle(fontSize: 20),
                ),
              ),
            ),
            Container(
              height: Constants().questionAreaHeight,
              color: Colors.green,
              child: Center(
                child: Text(
                  'Q${_questionIndex + 1}',
                  style: TextStyle(fontSize: 18),
                ),
              ),
            ),
            QuestionView(questionIndex: _questionIndex, questions: _questions),
            Expanded(
              child: Padding(
                padding: const EdgeInsets.fromLTRB(50.0, 30.0, 50.0, 50.0),
                child: Column(
                  mainAxisAlignment: MainAxisAlignment.spaceEvenly,
                  children: [
                    AnswerButton(
                        questions: _questions,
                        questionIndex: _questionIndex,
                        keyString: 'a'),
                    AnswerButton(
                        questions: _questions,
                        questionIndex: _questionIndex,
                        keyString: 'b'),
                    AnswerButton(
                        questions: _questions,
                        questionIndex: _questionIndex,
                        keyString: 'c'),
                    AnswerButton(
                        questions: _questions,
                        questionIndex: _questionIndex,
                        keyString: 'd'),
                  ],
                ),
              ),
            )
          ],
        ),
      ),
    );
  }
}今回は選択肢のボタンをタップすると問題が動的に切り替わるように変更したためMyHomePageをStatefulWidgetに書き直しました。
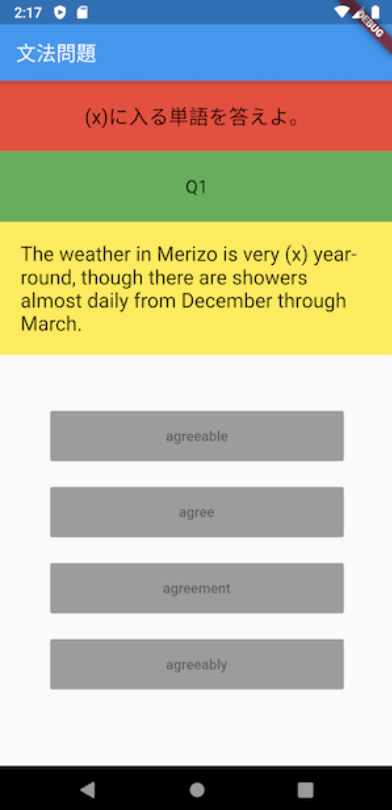
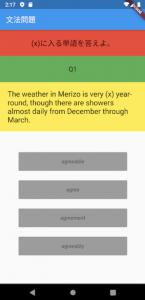
これで一度ビルドしてみましょう。
見え方が前回と同じであればリファクタリングの成功です。
次回はこの構成をもとにしてクイズアプリの機能を拡張していきます。