20. Flutter公式のプラグインを使ってWebViewを表示させる
tamappe Tamappe Life Log
今回はiOSでいうところのUITabbarControllerに当たるBottomNavigationBarについて学習します。
AppBarのように画面の上側ではなく、下側にもバーを表示させたいことがあります。
この下側にバーを設置するウィジェットがFlutter ではBottomNavigationBarが用意されています。
BottomNavigationBarの基本は以下の通りです。
BottomNavigationBar(
        currentIndex: [int値],
        items: <BottomNavigationBarItem>[BottomNavigationBarItemのリスト],
        onTap: [タップイベント],
      )
それぞれのプロパティの解説は次のようになります。
| プロパティ | 役割 |
|---|---|
| currentIndex | 現在、選択されているindex。このindexのアイコンが選択状態になる |
| items | 表示するitem。BottomNavigationBarItemのリストが入る |
| onTap | アイコンをタップしたときの処理。 |
アイコンをタップしたときの処理はonTapに入る関数内で書きます。
この関数にはタップした項目のindexを示す引数が必要で以下のように定義すれば大丈夫です。
void メソッド名(int value) {
// 処理内容
}ただタップした項目を選択状態にするためには、この引数のvalueとBottomNavigationBarの引数currentIndexの値が同じにする必要があります。そのため、変数を用意してメソッドの中で変数を更新させcurrentIndexにも同じ変数を設定する必要があります。
それではBottomNavigationBarに関するサンプルコードを書いていきます。
tab_navigation_bar.dart
import 'package:flutter/material.dart';

class TabNavigationBar extends StatefulWidget {
  @override
  _TabNavigationBarState createState() => _TabNavigationBarState();
}

class _TabNavigationBarState extends State<TabNavigationBar> {
  String _message;
  var items = ['first view','second view'];
  int _index = 0;

  @override
  void initState() {
    _message = items.first;
    super.initState();
  }
  @override
  Widget build(BuildContext context) {
    return Scaffold(
      appBar: AppBar(
        title: Text('TabNavigationBar App'),
      ),
      body: Center(
        child: Text(
          _message, style: TextStyle(fontSize: 20.0),
        ),
      ),
      bottomNavigationBar: BottomNavigationBar(
        currentIndex: _index,
        items: <BottomNavigationBarItem>[
          BottomNavigationBarItem(
            title: Text('first'),
            icon: Icon(Icons.favorite)
          ),
          BottomNavigationBarItem(
            title: Text('second'),
            icon: Icon(Icons.favorite),
          )
        ],
        onTap: _tapBottomIcon,
      ),
    );
  }

  void _tapBottomIcon(int index) {
    setState(() {
      _index = index;
      _message = items[_index] + 'を選択しました';
    });
  }
}
main.dart
import 'package:flutter/material.dart';
import 'package:practice_app/tab_navigation_bar.dart';
void main() => runApp(MyApp());
class MyApp extends StatelessWidget {
final title = 'BottomNavigationBarのサンプルコード';
@override
Widget build(BuildContext context) {
return new MaterialApp(
debugShowCheckedModeBanner: true,
title: 'BottomNavigationBar App',
theme: new ThemeData(
primarySwatch: Colors.blue,
primaryColor: const Color(0xff2196f3),
accentColor: const Color(0xff2196f3),
canvasColor: const Color(0xfffafafa),
),
home: TabNavigationBar(),
);
}
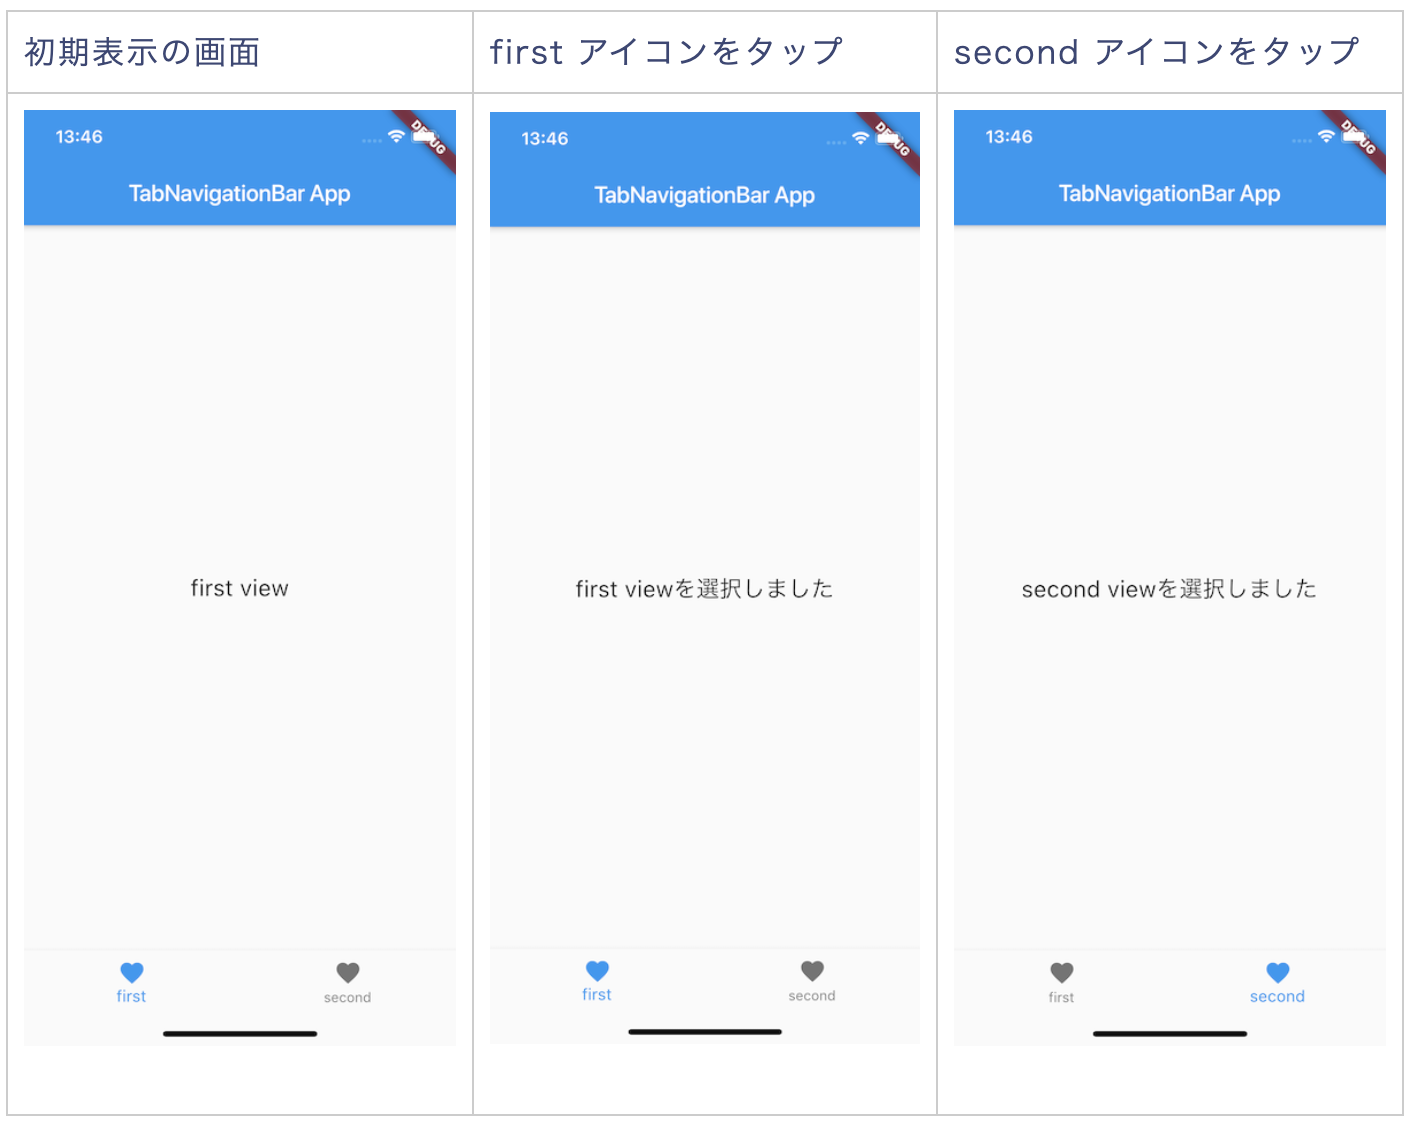
}このサンプルコードを実行すると次のような画面が表示されます。
| 初期表示の画面 | first アイコンをタップ | second アイコンをタップ |
 |  |  |
実際に触ってみると分かりますが、下側にUITabbarController みたいなタブバーが表示されて、アイコンをタップすると画面が切り替わるのが分かります。
本日はBottomNavigationBarについて学習しました。
ただこれだけではアイコンをタップしたことで文字を変更できるだけで画面遷移しているわけではありません。
実際にこれを使って画面遷移するためには次回に学ぶNavigatorウィジェットやFlutter のルーティングについて学ぶ必要があるそうです。