50. Flutterでダークモードを設定する
tamappe Tamappe Life Log
こんにちは、Tamappeです。
今回は前回の続きです。
前回はStackを使って棒グラフを作成しました。
今回はその棒グラフのUIを利用して複数ウィジェットを「比率」で配置する方法について解説します。
使うものはFractionallySizedBoxというWidgetです。
Flutterで開発しているとStackに複数のウィジェットを載せるときに複数ウィジェットを特定の比率で乗せたい時があります。
イメージでいえば、とあるウィジェットを7:3の比率で重ねたい場合、
Stack(
      children: [
        Expanded(
            flex: 7,
            child: Container()
        ),
        Expanded(
            flex: 3,
            child: Container()
        ),
      ],
    );
こんな感じのことを実現させたい場合です。上では7:3にはなりません。
ColumnやRowではExpandedやFlexbleの「flex」を使えば高さや幅を比率に応じて設定できます。例えば、このようにすると7:3の比率でウィジェットを並べることができます。
Column(
      children: [
        Expanded(
            flex: 7,
            child: Container()
        ),
        Expanded(
            flex: 3,
            child: Container()
        ),
      ],
    );
Stackでの相対比率でウィジェット並べる方法が思いつきませんでした。
そんなときに使えるのが「FractionallySizedBox」です。FractionallySizedBoxは親ウィジェットに対して相対的なサイズを指定したい場合に使えるものです。親ウィジェットから見た場合の子のウィジェットの比率を制御することができます。
ColumnやRowのように子から見て親ウィジェットが存在しない場合はFlexibleウィジェットでラップすると柔軟に対応することもできます。
FractionallySizedBoxの簡単な使い方はこちらになります。
Container(
      width: 300,
      height: 200,
      child: Stack(
        children: [
          Container(
            width: 200,
            height: 100,
          ),
          FractionallySizedBox(
              widthFactor: 0.7,
              heightFactor: 1.0,
              child: Container()
          ),
        ],
      ),
    );
FractionallySizedboxには親ウィジェットの何%の横幅を指定できるwidthFactorや縦ならheightFactorというパラメータが存在しています。widthFactorとheightFactorはdouble型なので、0.xで指定します。Maxは1.0になります。
const FractionallySizedBox({
    Key? key,
    this.alignment = Alignment.center,
    this.widthFactor,
    this.heightFactor,
    Widget? child,
  }) : assert(alignment != null),
       assert(widthFactor == null || widthFactor >= 0.0),
       assert(heightFactor == null || heightFactor >= 0.0),
       super(key: key, child: child);

  final double? widthFactor;

  final double? heightFactor;
これを使って前回作成できた棒グラフのパラメータを10%, 20%と言った感じの表現します。
それでは本題の棒グラフの値を絶対距離ではなく相対距離で制御できるように変更します。
前回の続きのBarGraphView
class BarGraphView extends StatelessWidget {
  const BarGraphView({Key? key}) : super(key: key);

  @override
  Widget build(BuildContext context) {
    return Scaffold(
      appBar: AppBar(
        title: Text('棒グラフ'),
      ),
      body: Center(
        child: Stack(
          children: [
            Container(
              width: MediaQuery.of(context).size.width,
              height: 50.0,
              decoration: BoxDecoration(
                borderRadius: BorderRadius.circular(25),
                border: Border.all(color: Colors.grey),
              ),
            ),
            Container(
              width: MediaQuery.of(context).size.width - 100,
              height: 50.0,
              decoration: BoxDecoration(
                borderRadius: BorderRadius.circular(25),
                color: Colors.green,
              ),
            ),
          ]
        ),
      ),
    );
  }
}
まず最初にStackの下に親ウィジェットとしてのContainerを載せます。widthは端末幅で高さは50に設定します。端末幅だとちょっとわかりにくいのでPaddingを使って左右に20の余白を入れます。
BarGraphViewを次のように変更します。
class BarGraphView extends StatelessWidget {
  const BarGraphView({Key? key}) : super(key: key);

  @override
  Widget build(BuildContext context) {
    return Scaffold(
      appBar: AppBar(
        title: Text('棒グラフ'),
      ),
      body: Center(
        child: Padding(
          padding: const EdgeInsets.all(20.0),
          child: Container(
            width: MediaQuery.of(context).size.width,
            height: 50,
            child: Stack(
              children: [
                Container(
                  width: MediaQuery.of(context).size.width,
                  decoration: BoxDecoration(
                    borderRadius: BorderRadius.circular(25),
                    border: Border.all(color: Colors.grey),
                  ),
                ),
                Container(
                  width: MediaQuery.of(context).size.width - 100,
                  decoration: BoxDecoration(
                    borderRadius: BorderRadius.circular(25),
                    color: Colors.green,
                  ),
                ),
              ]
            ),
          ),
        ),
      ),
    );
  }
}
これでソースコードをビルドしたときに画面上では次のように表示されます。
それでは、棒グラフのパラメータを%で表現できるようにします。
FractionallySizedboxで背景が緑色のCotainerをラップします。今回は棒グラフの横幅を全体の40%として設定します。
class BarGraphView extends StatelessWidget {
const BarGraphView({Key? key}) : super(key: key);
@override
Widget build(BuildContext context) {
return Scaffold(
appBar: AppBar(
title: Text('棒グラフ'),
),
body: Center(
child: Padding(
padding: const EdgeInsets.all(20.0),
child: Container(
width: MediaQuery.of(context).size.width,
height: 50,
child: Stack(
children: [
Container(
decoration: BoxDecoration(
borderRadius: BorderRadius.circular(25),
border: Border.all(color: Colors.grey),
),
),
FractionallySizedBox(
widthFactor: 0.4,
child: Container(
decoration: BoxDecoration(
borderRadius: BorderRadius.circular(25),
color: Colors.green,
),
),
),
]
),
),
),
),
);
}
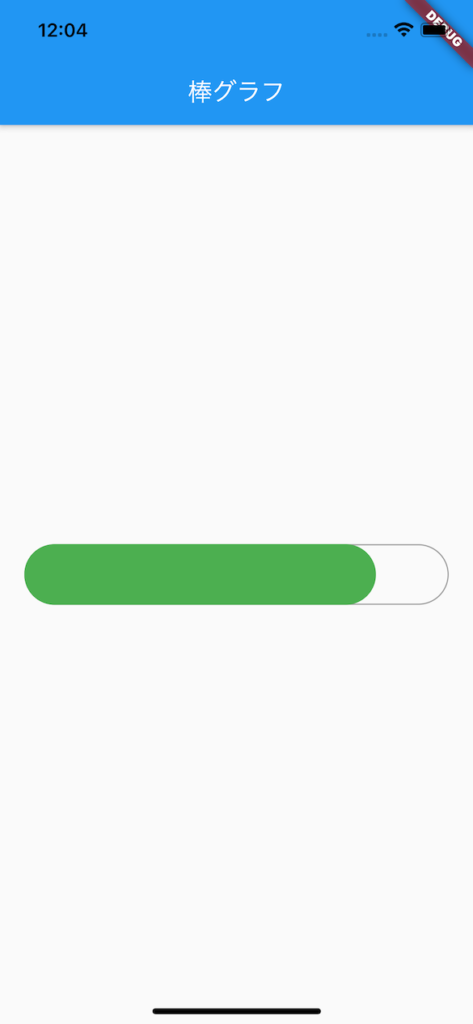
}これでソースコードをビルドすると、次のような画面が表示されます。
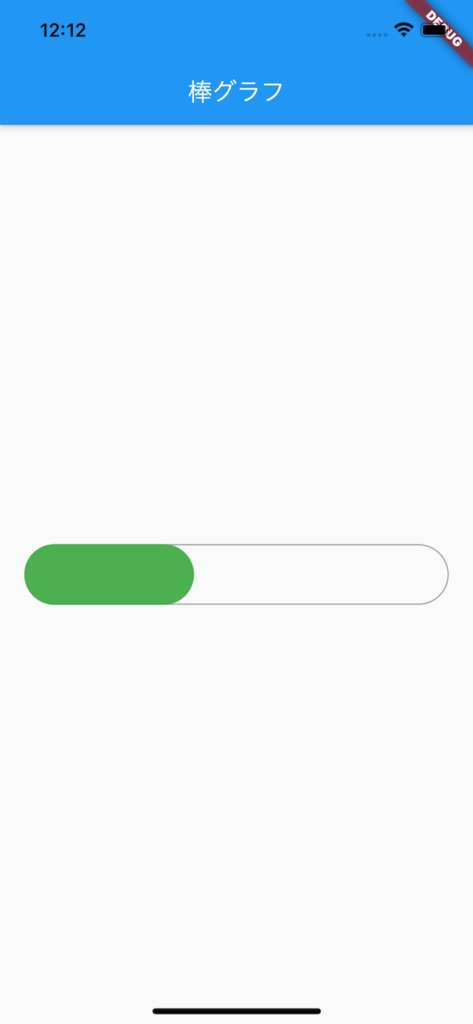
角丸がついているのでわかりにくいですが、棒グラフの全体に対して40%のパラメータを表現することができました。
部分的にソースコードを抽出すると
Container(
            width: MediaQuery.of(context).size.width,
            height: 50,
            child: Stack(
              children: [
                Container(
                  decoration: BoxDecoration(
                    borderRadius: BorderRadius.circular(25),
                    border: Border.all(color: Colors.grey),
                  ),
                ),
                FractionallySizedBox(
                  widthFactor: 0.4,
                  child: Container(
                    decoration: BoxDecoration(
                      borderRadius: BorderRadius.circular(25),
                      color: Colors.green,
                    ),
                  ),
                ),
              ]
            ),
          )
このようにFractionallySizedBoxのwidthFactorに0.4を指定しました。
これでStackをラップしている横幅が端末幅のCotaninerの横幅に対して40%の横幅に制御できます。
ということで、Stackに配置されている複数ウィジェットのサイズを比率で制御したい場合のやり方がわかりましたね。
それでは、バイバイ。